Saturday, November 9, 2013

Roasted Butternut Squash and Onion Bread Pudding


This recipe was all about leftovers and for me the leftovers were old bagels.  I had about 5 onion bagels left that I didn't know what I was going to do with, so in my mind I know I always make a bread pudding whenever I have leftover bagels so I thought why couldn't I make a savory bread pudding?  And thanks to Pinterest I came out with this awesome recipe.

Ingredients:

1 small butternut squash, peeled and cut into ½” cubes (about 2 cups)
1 medium onion, thin sliced
3 garlic cloves, minced
1 Tbl. olive oil
½ tsp. thyme
¼ tsp. salt
¼ tsp. pepper
1 tsp ground sage
1 cup lowfat milk (1%)
6 eggs
1 cup shredded Cheddar cheese (divided)
¼ tsp. pepper
8 cups (1-inch) cubed day-old bagels or crusty bread

Instructions

Preheat oven to 400 degrees.

Line shallow baking pan with foil, spray with cooking spray.

Toss butternut squash, onion, garlic, thyme, salt & pepper in olive oil and spread in single layer on baking sheet. Roast for 20 – 25 minutes until very tender.

(One thing I will mention as a helpful hint, before I cup up the squash I will throw it in the microwave for 5 minutes to soften it up, it makes life so much easier when you try to cut up the squash.)

Spread bread cubes onto a baking sheet and toast along with squash mixture for 8-10 minutes until cubes are firm and crunchy.

Whisk together milk, eggs, 1/2 cup shredded cheese, pepper and nutmeg and sage.

In a large bowl milk/egg mixture, and roasted veggies with bread cubes.

Pour into a 2 Qt. baking dish and bake 40 – 45 minutes until pudding is set and top is lightly browned. Let sit for 5 minutes before serving

Friday, July 26, 2013

Rainbow Cake

I tried my first rainbow cake.  I loved the way it came out and it tastes delicious!

Here is how it went down.


Tuesday, May 14, 2013

Pineapple Chicken


I promise I will add a real picture next time I make it.  But I promise it's delicious and will be a go to dish.

Ingredients:

1 lb boneless skinless chicken breast, cut into 1-inch cubes
2 teaspoons olive oil, divided
1 tbsp chopped garlic (to taste)
1 tsp dried ginger
1 bell pepper cubed (I use red/green)
1 cup chopped onion
1 tsp crushed red chili pepper flakes, (optional or to taste)
1 can pineapple chunks in juice (divide juice and put aside)
1/2 cup Trader Joe's Island Soyaki, divided
cilantro leaves (for garnish)
1 cup uncooked rice  (I use Basmati rice)


Directions:

1.Cube chicken and marinate with 1 portion of Island Soyaki in ziploc bag.

1. Cook rice replacing water for pineapple juice I use 1 cup of rice to 2 cups of water, so whatever juice you have replace the balance using water.

3. In the meantime, coat the bottom of a pan with balance of Soyaki, pineapple chunks (drained) onion, peppers and tsp of oil.  Saute veg until pineapple is caramelized.  Remove from pan and set aside. Heat remaining 1 tsp of oil over medium-high heat. Add garlic, ginger, red pepper flakes, and chicken including marinade to pan; sauté 5 minutes or until chicken is done.

4. Return veg mixture to pan. Cook 1-2 minute until mixed and heated, and sauce will thicken.

5. To serve: Spread ½ cup rice over each plate. Top each with about 1 cup sweet and sour chicken.  Garnish with cilantro.

6. ENJOY!

Also you can experiment a little, I've done this with Pork Chops and I've also replaced the peppers with green beans.

Makes 4 servings (1 cup pineapple chicken plus ½ cup rice)

Saturday, March 2, 2013

Easy Peasy Pad Thai


(makes 2 huge servings or 3 servings)

1 package of cooked pad Thai noodles
1 boneless chicken breast or 2 thighs, chopped up into small pieces (I used thighs this time and breasts last time)
3-4 cloves garlic, minced
1 tsp. Ginger
4 green onions, sliced (save 1/2 for sauce)
1 egg
1 package of frozen stir fry veggies (Trader Joe's includes Carrots, bean sprouts, water chesnuts, edamame, snow peas)
1/4 cup chopped peanuts
2-3 Tbsp. vegetable oil for stir-frying
10 fresh basil leaves chopped. (put about a 1/4 of it in sauce)
1 cup coconut lime water

PAD THAI SAUCE:
1/2 cup coconut lime water (save 1/2 for sauce)
3 Tbsp. rice wine vinegar
2 Tbsp of Red Pepper Paste with Garlic and Lime (bought at Whole Foods)
3 Tbsp. Peanut Butter (I used natural no sugar added)
3 Tbsp. soy sauce (really should be fish sauce but I forgot it)


Make Pad Thai Sauce prior to cooking you will need it.


Instructions:

Heat a wok or large frying pan over medium-high heat. Drizzle in the oil and swirl around, then add the garlic, chili, ginger, basil and the 1/2 the green onions. Stir-fry 1 minute.

Add chicken to pan stir-fry until the chicken is opaque add coconut water and continue to cook if pan becomes dry, add 1-2 Tbsp. of the pad Thai sauce - just enough to keep ingredients frying nicely.

Push ingredients to the side of the pan add a little oil if necessary and crack egg into center and stir-fry quickly to scramble.

Add noodles then slowly add the pad thai sauce little by little then fold in frozen Stir Fry veggies.

Remove from heat and taste-test, adding more fish sauce or soy sauce to taste (if desired)

Top with remaining green onion and a small heap of chopped/ground nuts.

ENJOY!

Sunday, November 25, 2012

Hoot and Collar


I found the perfect Owl Cowl on Pinterest and when I saw it I knew I needed to knit it.  So I wrote the pattern out if anyone wants it here you go.

Abbreviations:
BO = bind off
C4B = Cable Four Back; Worked over 4 sts. Place the first 2 sts on cable needle, hold in back of work, K2, then K2 from the cable needle.
C4F = Cable Four Front: Worked over 4 sts. Place the first 2 sts on cable needle, hold in front of work, K2, then K2 from the cable needle.
K = knit
P = purl
sts = stitches
SS = Seed Stitch K1 P1*Repeat then P knit sts and K purl sts

Cast on 16 Stitches

Knit 10 rows of seed stitch

Owl Pattern

Row 1: SS 4  K8, SS to end.
Row 2: SS 4, P8 SS to end.
Row 3: SS 4, C4B, C4F, SS6 to end.
Row 4: SS 4  P8, SS to end.
Row 5: SS 4  K8, SS to end.
Row 6: SS 4  P8, SS to end.
Row 7: SS 4  K8, SS to end.
Row 8: SS 4  P8, SS to end.
Row 9: SS 4  K8, SS to end.
Row 10: SS 4  P8, SS to end.
Row 11: SS 4 , C4B, C4F, SS to end.
Row 12: SS 4  P8, SS to end.
Row 13: SS 4 , K1, P2, K2, P2, K1, SS to end.
Row 14: SS 4  P1, K2, P2, K2, P1, SS to end.
Row 15: SS 4  K8, SS to end.
Row 16: SS 4  P8, SS to end.
Row 17: SS 4, C4B, C4F, SS to end.
Row 18: SS 4  P8, SS to end.

Knit until scarf measures 10 inches BO

Attach ends to make point.

Sew contrasting colored buttons on owl’s eyes (optional)

Enjoy!


Friday, October 5, 2012

Banana Nut Beer Bread


I was chatting online and the topic of bananas came up and how some people didn't like them in any way, shape or form.  Someone said what about Banana Nut Beer and read  someone said Banana Nut Bread, and thought wow that would be delicious.

So I had to try to make it and I must say it was the most delicious Banana Bread I've ever made and I can say yes I will make it again and again.

INGREDIENTS:
1 3/4 cup all-purpose flour
3/4 cup granulated sugar
1 1/4 teaspoon baking powder
1/2 teaspoon baking soda
1/2 cup chopped walnuts
3/4 teaspoon salt
2 large eggs
3 medium bananas, mashed
1/3 cup melted butter or margarine
1/4 cup beer


DIRECTIONS:
Preheat to 350 degrees . Lightly grease and flour a loaf pan.

In a large bowl blend together the flour, sugar, baking powder, baking soda, walnuts, and salt. In a medium bowl, beat the eggs until foamy before beating in the bananas, butter and beer. Combine the two mixtures, blending until the two ingredients are moistened.

Scrape the batter into the prepared pan and bake for 55 to 60 minutes, or until a cake tester or wooden toothpick inserted into the center of the bread comes out clean and the top is golden.

Remove from the oven and cool in the pan on a wire rack for 5 to 10 minutes before removing the loaf from the pan.

Enjoy!


Thursday, July 12, 2012

Crock Pot Tuscan Chili


I've been trying to come up with a few new ideas for crock pot cooking, working 10 hours a day, and trying to run two households cooking can be a challenge, a time challenge for sure.

I was in the local market and saw a bag of "chili" mix that had lentils, spices and a few other things, just add meat and tomatoes.

So it got me thinking and I can make chili with lentils, but what else do I put into it, and hot Italian sausage came to mind, and then what to go with it. Why not artichokes and spinach?


Ingredients:
1lb lentils
1 package hot italian sausage 
1 frozen package of spinach
1 can of artichoke hearts
dried onion and garlic powder to taste
2 bullion cubes

Directions:
Add lentils to crock pot with bullion, artichokes, frozen spinach and 4 cans of water (I used the artichoke can) so maybe 6 cups of water in total because it was a 12oz can, and soak lentils, I soaked them overnight in crock on counter
Cook on low for 8 hours in crockpot
Take the sausage out of the casing, crumble and brown, and add lentil mixture when there is about an hour left off cooking.
Finish cooking and serve and enjoy, this will easily serve 6 probably 8 people we fed three people for two meals and the dinner portion was huge.

I hope you like it, we loved it.

Wednesday, October 12, 2011

Stuffed Portabello Mushrooms

Here's another low carb recipe for you.

I love mushrooms and they work great for so many things and they're totally yummy, so here is my latest and greatest using them.

Ingredients:
1/2lb Ground Beef
1/4 c Pearled Barley
1/2 small onion
3/4 cup water
1 clove garlic
tbsp dried basil
1 cup of frozen mixed veggies
salt and pepper to taste (I added when I cooked the barley it sucks up all the salt and can get bland)

Directions:

Brown beef with onions, garlic, basil. Once it's cooked add barley frozen veggies and water, cover and let cook for 35 minutes or until barley is cooked and tender.

When all cooked, take meat and veggies and stuff the mushrooms and put back in skillet with a little white wine and evoo adn cook for about 10 minutes or until mushrooms are cooked.

I love this recipe and I will make it again and again.

Wednesday, October 5, 2011

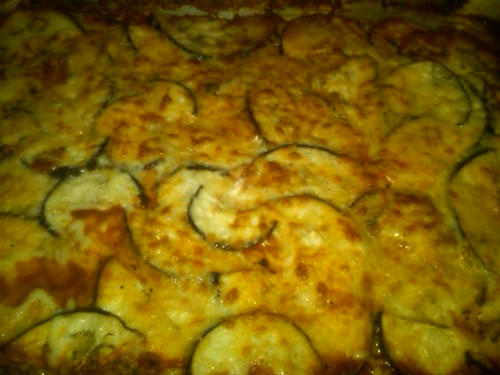
No-Fry Eggplant Parm/Lasagna

I've been eating carb free for the past 2 weeks and it's going well, but I've been running out of things to eat.

So I figured I could make eggplant parm, and just not fry the eggplant. I was afraid it would work because the eggplant would be too flimsy to keep together, but it worked out great. I do have to say I added some ground turkey to it to bind it together, so the eggplant worked like lasagna.


So here's what I did.

Ingredients.

1lb Ground Turkey
1/2 chopped onion
1 clove of chopped garlic
tbsp of dry basil (to taste)
tbsp of dry oregano (to taste)
2tbsp of EVOO
1 24oz can of crushed tomatoes
1 large eggplant
4 oz of shredded mozzarella cheese (about 1/2 bag)
1 cup of ricotta cheese

Instructions:

Brown turkey, onions, garlic, basil, oregano in EVOO until cooked. After the meat is cooked add the can of tomatoes, all but about a tbsp left in the bottom....save that.

While browning meat slice with a mandolin (if you have one)the eggplant. I cut it in 1/2 length wise 1st, it's easier to slice. use the thinest setting. (If you want the bitterness out of the eggplant place them after they're sliced and cover them with a little salt....trust me it helps.)

Take the little bit of tomatoes in the bottom of the can and add about 1/3 to 1/2 of the can with warm water and add to the bottom of a 9x13 baking pan. It doesn't have to be a lot of water in the bottom of the pan, just enough to cover it.

Add a layer of sliced eggplant to the bottom of the pan untill you don't see any pan left.

Next take the ground turkey and sauce and completely cover the eggplant.

Next take the ricotta cheese (you can add alittle basil to this for flavor, I did, I also added a little dry garlic powder as well)

Drop about 10 or 12 blobs of cheese all over the meat and sauce and spread it into the meat so it's even. Add some mozz cheese to the top of the meat and ricotta cheese mixture.

Next add another layer of eggplant and a little more mozz chesse to cover it.

It's all put together now, cover with foil and bake at 350 for about an hour. After hour uncover let bake for another 5 or 10 minutes to brown the top of the cheese.

I would let it sit about 15 minutes to set up a little before eating.

It came out really good, and it's something I will totally make again.

Saturday, July 9, 2011

Must make pie!

I was watching Food Network (shocker I know) but Paula was cooking and I saw this and went YUM!!

Frozen Pineapple Pie

Tuesday, July 5, 2011

Indepence Day

What a great day a day to celebrate America's 235th Birthday, but a very cute craft. A flag wreath to put out on the door to welcome everyone that see's it.

I found a great tutorial here from My Green Brea Cottage. I saw it and instantly knew I had to make it. It was so cute and so festive and perfect to keep up all summer long.

This is how mine came out. I used about one yard in total of fabric, I bought the 2 3/4 yards the blog called for but didn't use anywhere near that amount.

I made the "stripes" the same way by alternating 5 ties of red and white, and a total of about 20 blue ties. They were all scrunched together and I just love it.

Hope you enjoy it as well.

Adding the ties.

IMG00936-20110705-1832.jpg

Close up of the ties.

IMG00938-20110705-1832.jpg

Finally on the door.

IMG00951-20110705-2158.jpg

Sunday, July 3, 2011

Summer time cookies

I saw these and thought they would be the perfect summer time cookie. You don't really want to bake in the summer because it's hot and sticky out, but whats hotter and stickier than s'mores, not anything I can think of.

So to honor that summer time fun how about s'mores cookies? I found this
recipe from The Girl Who Ate Everything. And I really can't wait to bake them.

Thursday, June 30, 2011

My new addiction.

I've found a new addiction, not knitting, not crafting, not cooking, not sports.

But PINTERST!!

So, feel free to follow me if you would like, I love to find new and interesting things.


Saturday, May 28, 2011

Yarn and Flip Flops.

Two great things, that go great together!!

I've done this before, but it's a really cute way to dress up a pair of plain flipflops.

Just wrap the yarn around and tie in to the ends. Super cute and quick and easy craft.


Friday, May 27, 2011

I really need to make these.

This wonderfully whimsical cupcake recipe is courtesy of Karen Tack and can be found in her dessert cookbook "Hello, Cupcake!"

And really who doesn't love corn on the cob?